
What is GeoVic?
GeoVic is an extremely useful (and free!) online mapping application that enables you to build your own maps, search, and access data, tapping into a huge range of data sources. GeoVic is accessed freely in your internet browser, so no download or application installation required.
GeoVic is a valuable tool for both gold prospectors and those with an interest in Victoria's fascinating gold mining history!
GeoVic can be a bit daunting when you first check it out, so hope that this basic GeoVic tutorial will help anyone who is first opening up GeoVic and unsure what they're looking at.
You can watch the video tutorial below, or keep scrolling to read the written tutorial.
How to access GeoVic
Visit the GeoVic page on the Earth Resources website at: https://earthresources.vic.gov.au/geology-exploration/maps-reports-data/geovic
Computer or mobile?
GeoVic is best viewed on a computer, but is also accessible on tablet and mobile (with a few capabilities missing). Browsing GeoVic on a tablet is pretty do-able, but on a mobile phone it can become very tedious due to the smaller screen size.
A benefit of using it on a mobile device is that you can show your current location on the map - great for when you're out at the area you're researching.
In general though, I find that having it open on a computer screen is ideal.
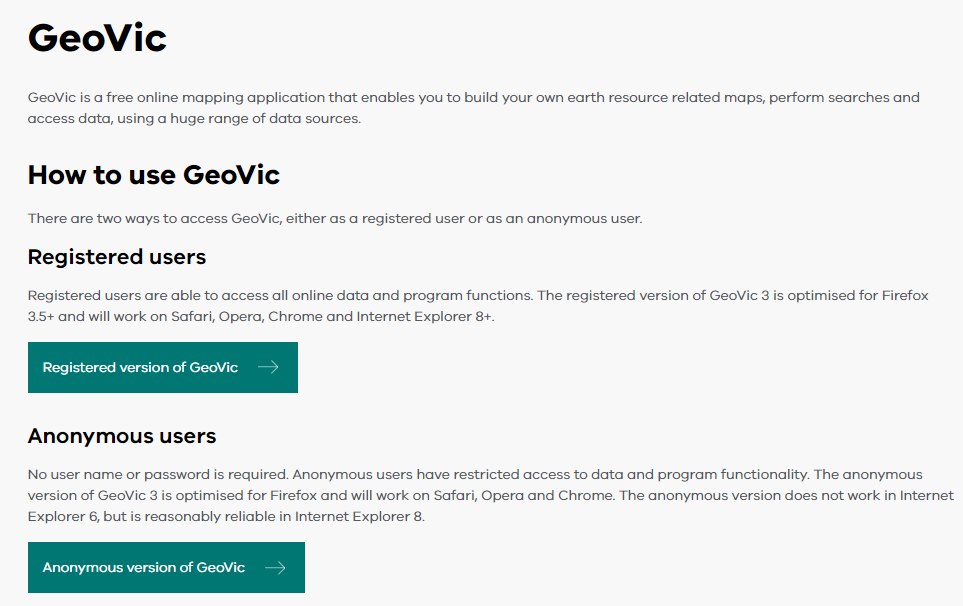
Registered or anonymous?
As you can see in the above image, there is a 'registered version' and an 'anonymous version' of GeoVic. It is free to sign up for an account, and you will have access to all online data and program functions.
For this tutorial, we will be using the registered version of GeoVic on a computer.
Launch and get to know GeoVic
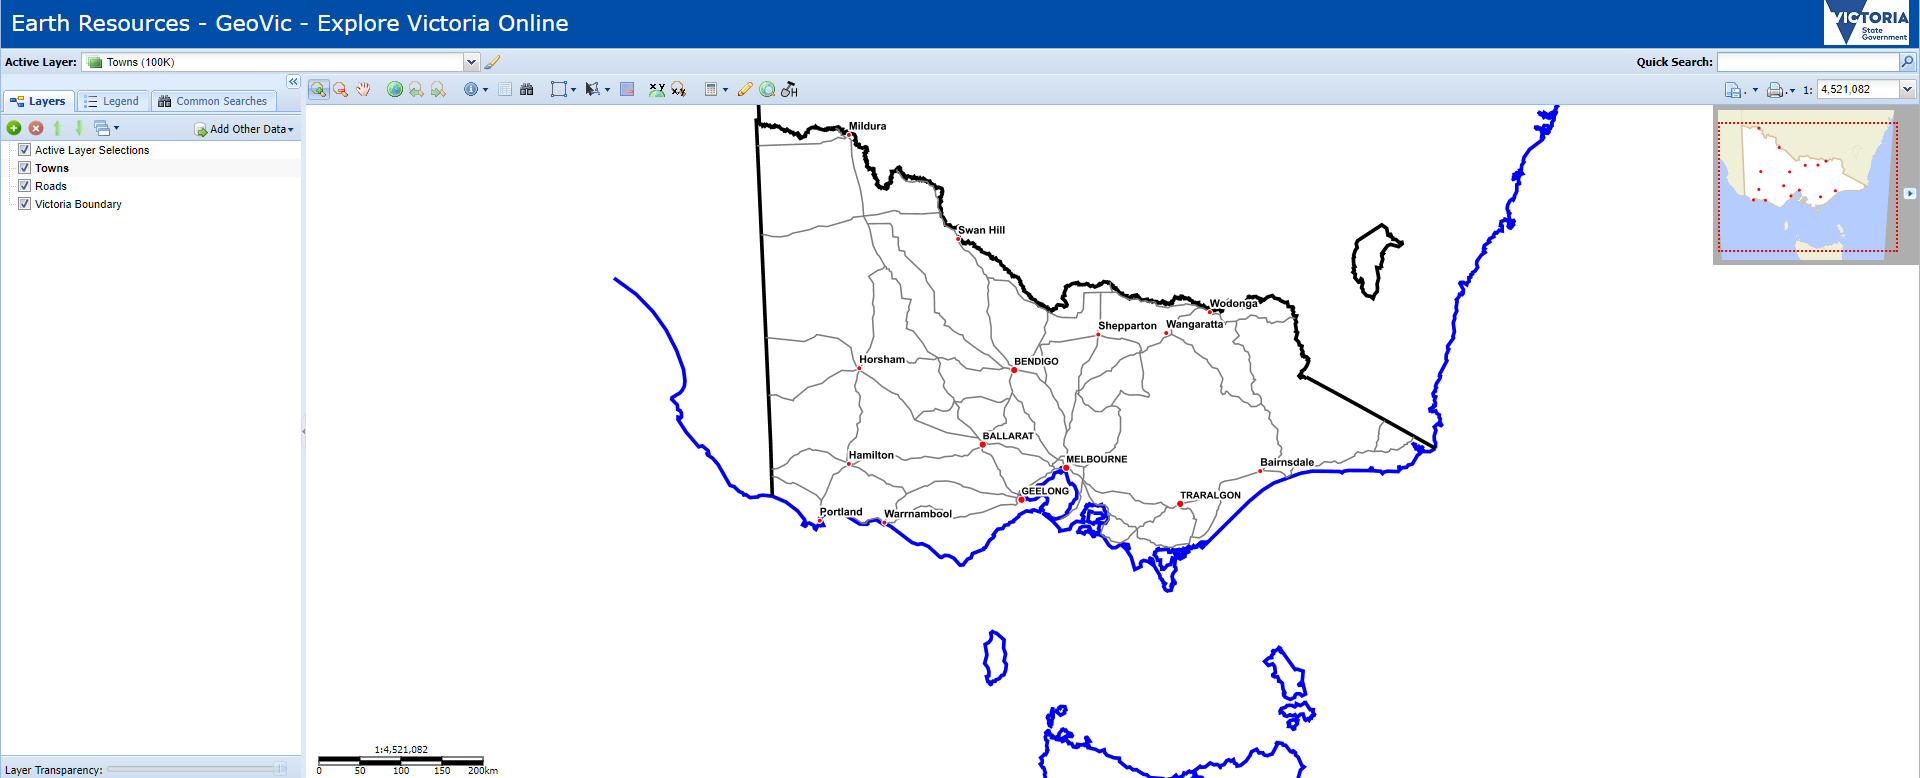
Once you've registered/signed in (or clicked the option to use the anonymous version), GeoVic opens and displays the screen pictured above.
This shows a basic map of Victoria (in the middle of the screen), with a few data layers automatically displayed - Active Layer Selections, Towns, Roads, Victoria Boundary (shown on the left hand side).
There are a series of tools/buttons located to the top of the map. From left to right these are:
- Zoom in (zoom by clicking, or by clicking and dragging over an area to zoom in on)
- Zoom out
- Pan (move around on the map by clicking and dragging)
- Initial extent (zoom back out to the overall view of Victoria)
- Previous extent (like hitting 'back' on your browser, it takes you back to your previous location/zoom)
- Next extent (same as above, but moving forward)
- Identify (shows place information. Use the drop down menu to select options)
- Tabular view
- Advanced search
- Select features
- Clear the selection from the active layer
- Coordinate display (shows the coordinates of your mouse cursor)
- Measurement tools (measure distances on map)
- Markup/redline (add your own notes and pins to the map display)
- Google Maps (display the current location in Google Maps)
- Historic mining activity report
There is also a Quick Search box on the top right, where you can search and zoom in on specific locations.
Zoom in on a specific location
We will start by zooming in on an area - we are going to look at Maryborough.
I find it useful to switch from the zoom tool (which is automatically selected when you open GeoVic) to the pan tool (the little hand icon above the main map), so that I can click and drag with the mouse to move around while just using the scrolling mouse wheel to zoom in and out on the map.
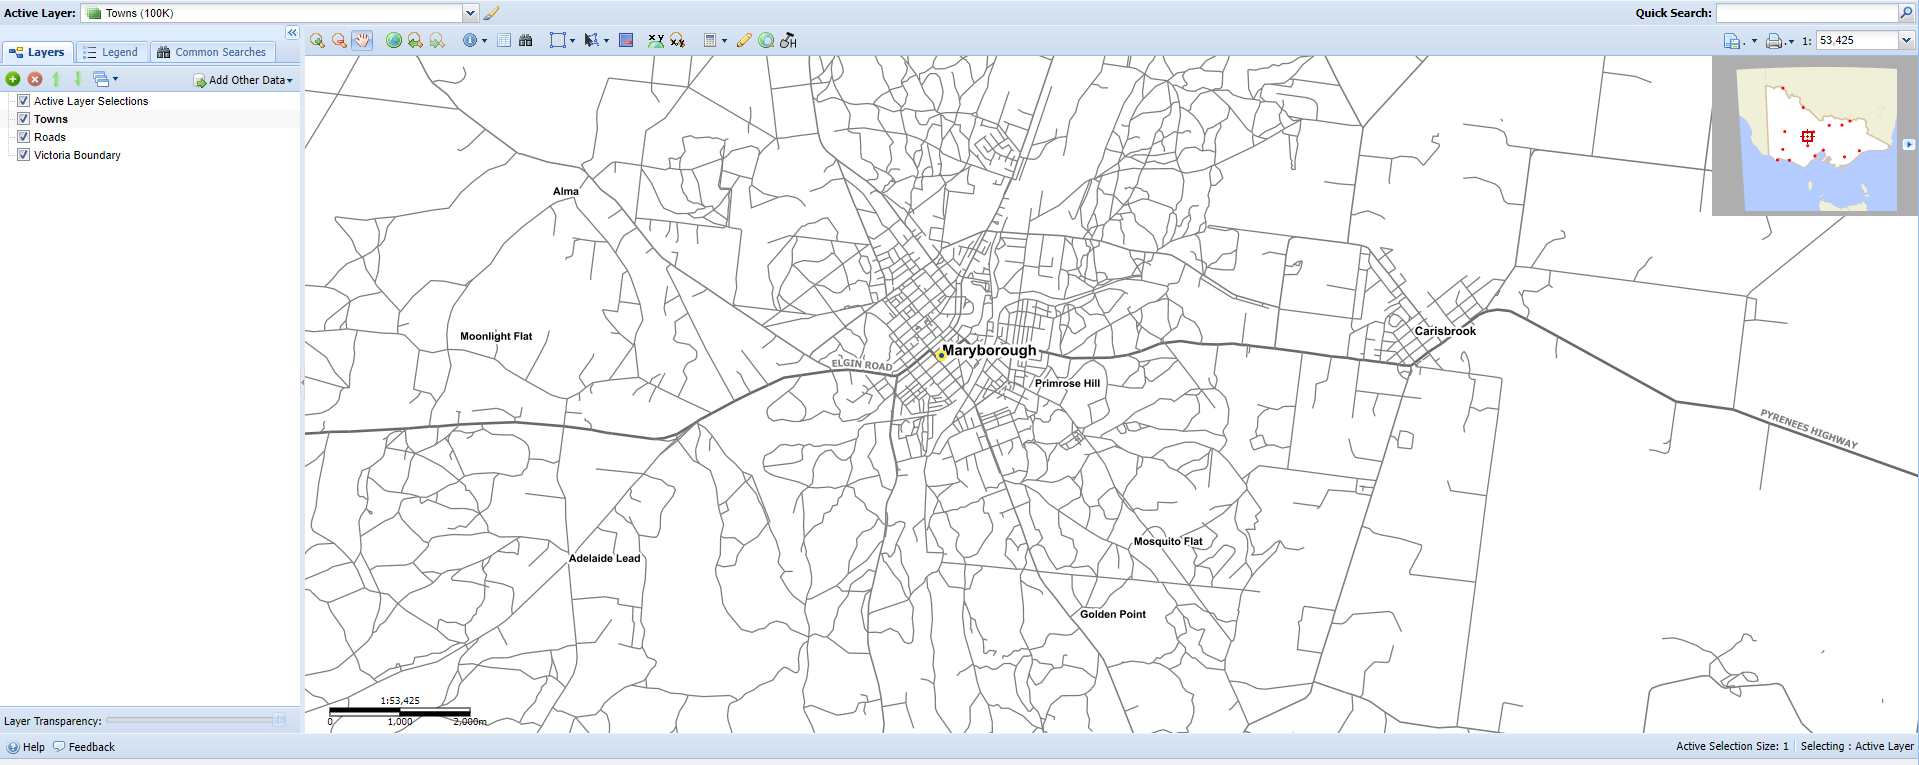
So here we have Maryborough and surrounding areas displayed on the map. The map is currently only showing the basic data layers of towns and roads.
Adding data layers in GeoVic
The brilliant thing about GeoVic is that you can build your own map by adding and removing the data layers you need.
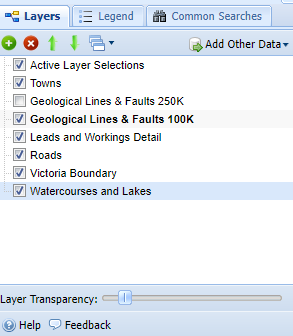
The layers tool is located on the left hand side of the screen, and looks like this:
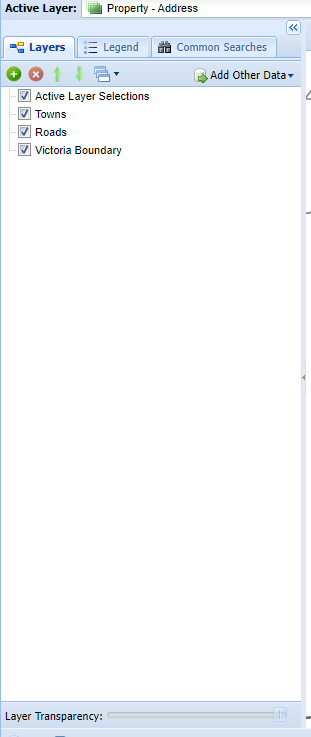
You can add or remove layers using the green + button and the red x button.
You can also change the order of layers, which changes the order they are displayed over each other on the map, using the green up and down arrows.
The transparency of each layer can be adjusted using the slider at the bottom. This is handy when you've got lots of layers active on your map, as it can get very busy.
We are going to start by adding a few useful layers to our map. Click on the green + button, which will open the following:
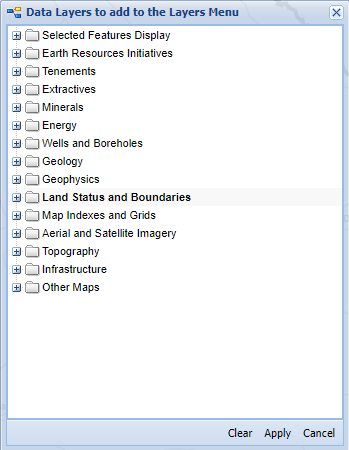
The first layer we are going to add to the map is under the section "Topography". Click on Topography, which will display more options. Select Watercourses and Lakes by clicking the check-box.
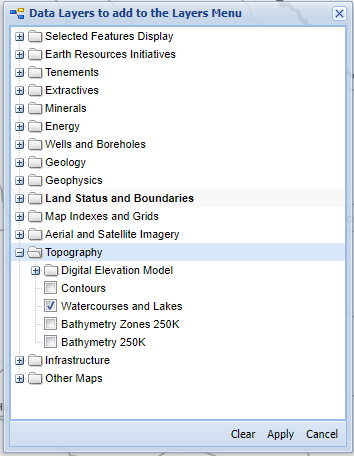
Hit apply, and the map will now display watercourses and lakes as blue lines. I like to add the watercourses to the map because it gives you a better idea of the layout of the land at the surface.
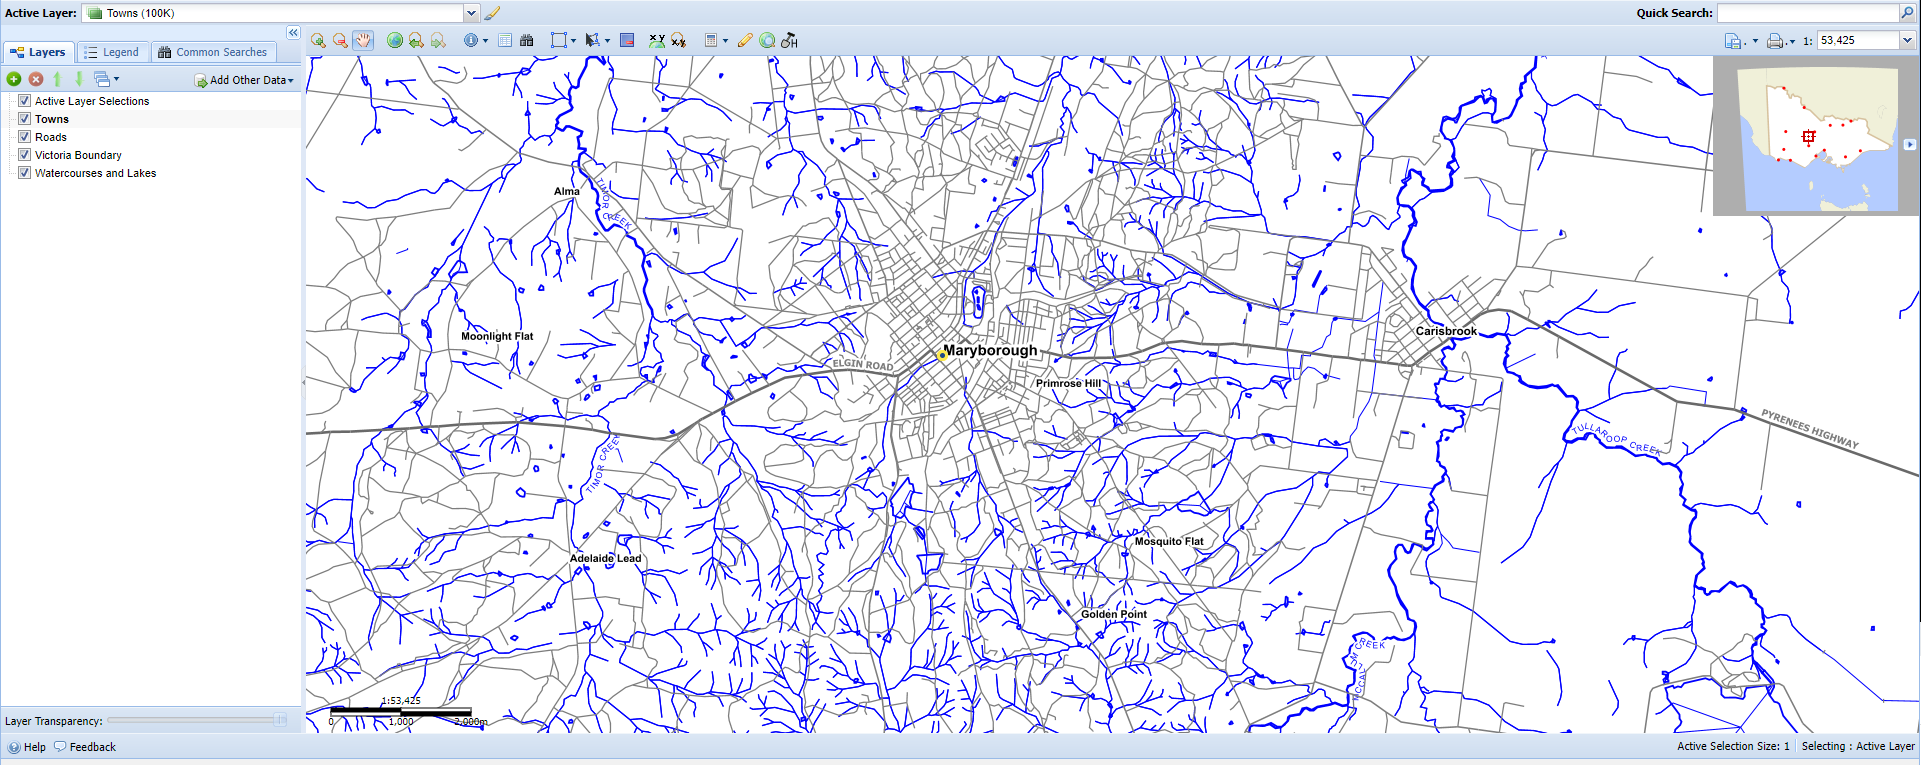
Now we will add another layer, which is very useful. Hit the green + button in the layers tool again, and under the section "Minerals" select "Leads and Workings Detail" by clicking the check box.
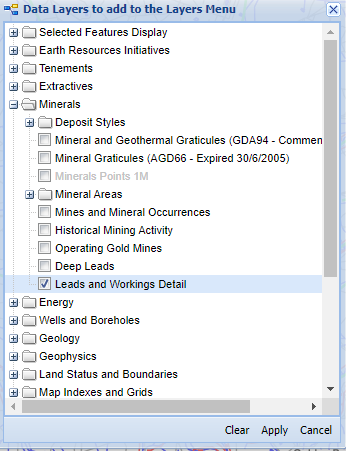
This will display data for "shallow working, shallow leads, and deep leads" on your map. As you can see in the image below, it has added some very interesting details!
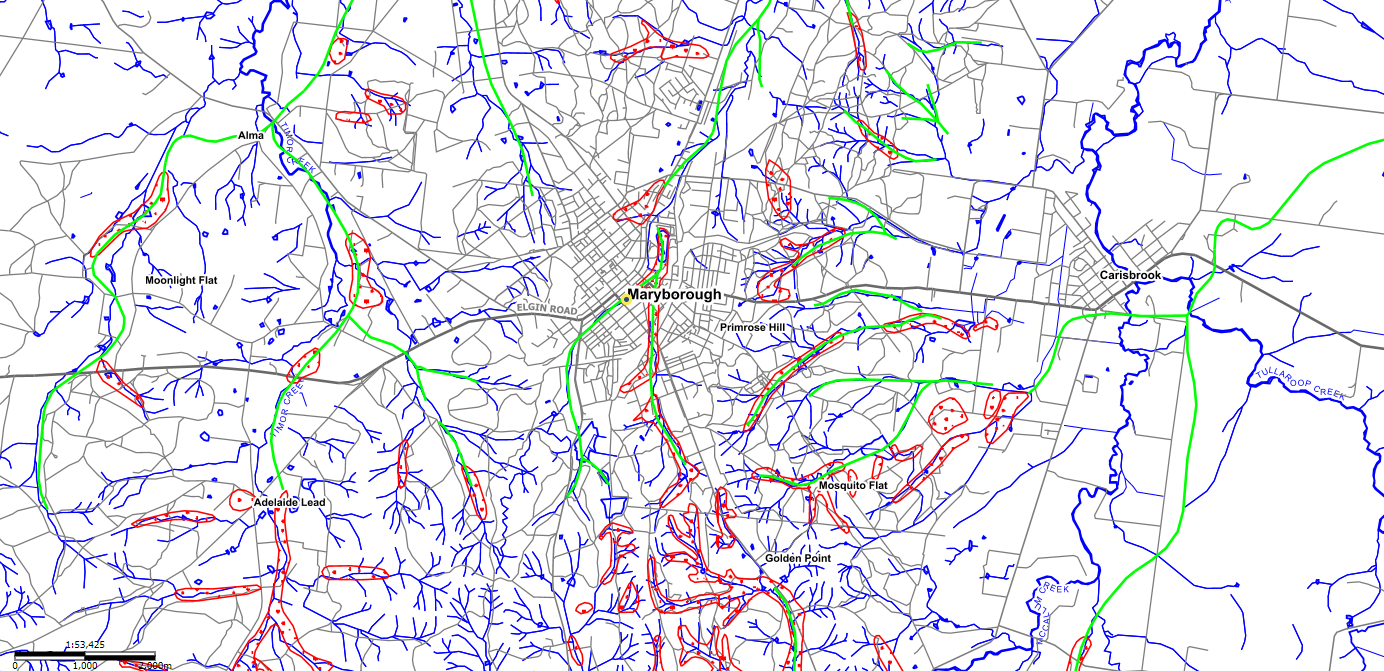
To understand what you are looking at on the map at any time, you can switch to the "legend" tab, which is beside "layers" to the left of the main map.
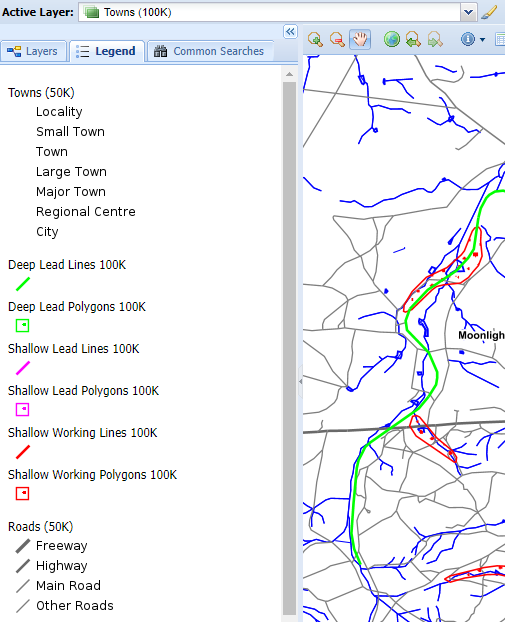
By looking at this Legend, we can see that shallow workings are displayed in red, shallow leads are displayed in purple, and deep leads are displayed in green.
What are these shallow workings and leads?
You may notice that the layout of these shallow workings and leads looks awfully similar to the layout of the watercourses displayed on the map. That's because they are indeed watercourses - but ancient ones!
A lead is an ancient watercourse/riverbed which has been buried over time (by lava flows, or by deposition of newer layers of sand or gravel), and these ancient riverbeds were often extremely rich in gold.
The old time miners would trace these ancient watercourses from areas where they're quite shallow and easy to find, and then follow the ancient riverbed as it runs deeper underground, where they then became classed as shallow leads and deep leads.
For prospectors, the main areas you will want to focus on are the areas of shallow workings. These areas were worked by the old timers because they were rich in gold, and the gold wasn't very deep.
The leads are classed as leads because they are buried - miners had to sink shafts to get to the ancient riverbed. Although you aren't likely to reach the gold-bearing riverbed with your detector at these areas, you might find some gold among the mullock heaps alongside the shafts.
But keep in mind, there could also be more recent gold deposits closer to the surface in those areas. They found plenty of gold around the shallow surface workings of Ballarat before they realised the unfathomable riches which lay waiting, in the now famous deep leads below.
Shallow workings
Any areas in or around the old "shallow workings" marked on GeoVic, where you find the ground is indeed quite shallow (not too much ground to dig through to reach bedrock), are good places to check out with your detector.
Some shallow workings were mined by "paddocking" or "surfacing". These are great areas for detecting around. We've got a page about surfacing which you may find useful.
"Shallow workings" shown on GeoVic can often still be too deep for detectors. If the old timers were digging shafts to reach the gold-bearing layer, you may have luck detecting their old mullock heaps beside their shafts. This is the earth they pulled out of the ground to reach the gold-bearing "wash" at the bottom, and as they got closer to the bottom, some of the gold-bearing layer was sometimes thrown up into the mullock.
What about reef gold?
Not all gold lies trapped in river beds, sometimes it gets stuck in other places, such as down a hillside beneath an exposed gold-bearing quartz reef.
Reefs are not all gold-bearing, but some of them sure are. Although many reefs are located deep underground, and were reached by large mining companies with substantial equipment (in other words, not accessible by the modern day prospector), it's handy and interesting to know where these reefs are.
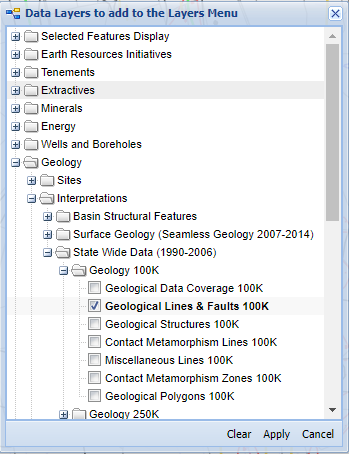
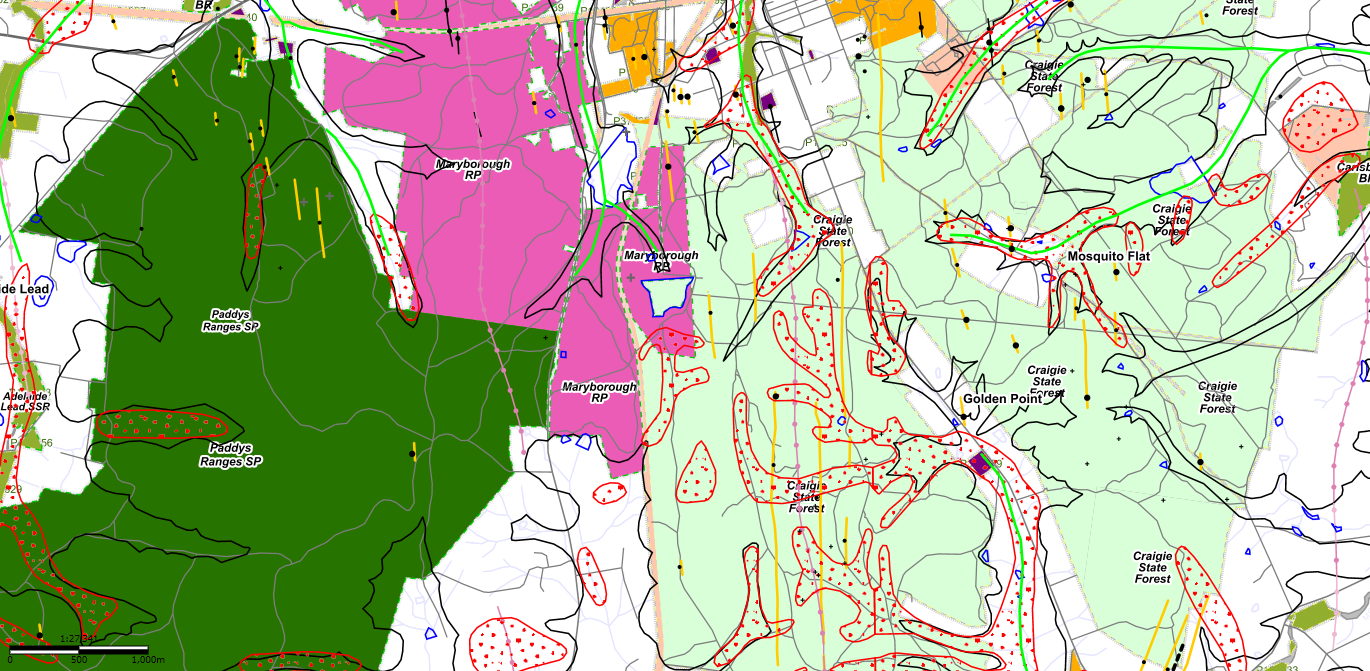
To add reefs to your map, click the green plus button to add another layer. This time we are going to go Geology > Interpretations > State Wide Data (1990-2006) > Geology 100K > and then tick the checkbox for Geological Lines & Faults 100K.
Now our map is starting to get a bit busy, so I have faded the 'watercourses and lakes' layer by selecting it, then adjusting the 'Layer Transparency' using the slider at the bottom of the layers area. I can still see them, but they're not as prominent. The image below shows the 'Watercourses and Lakes' layer selected, and the transparency slider at the bottom.
So with the new layer added, and the watercourses more transparent, our map now looks like this!
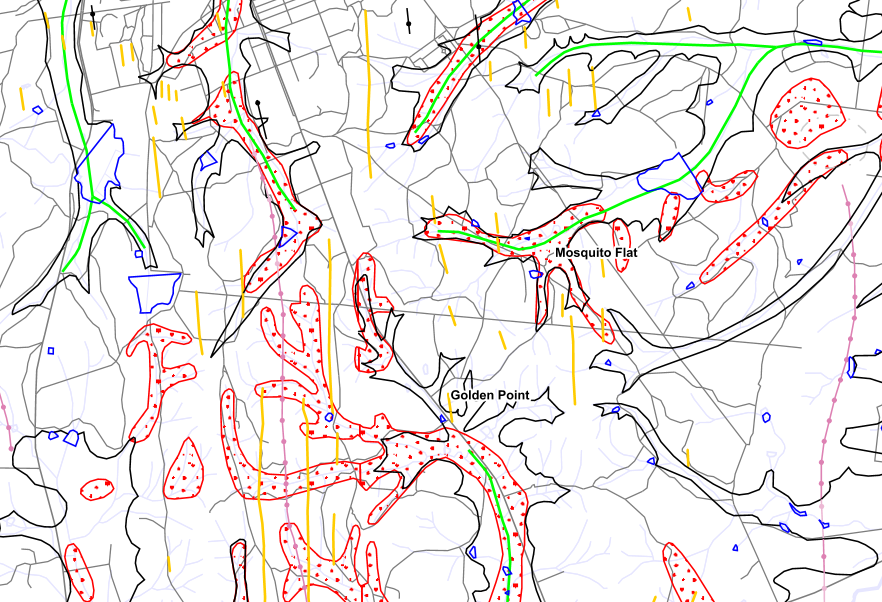
The yellow lines are quartz veins, or reefs. These are not necessarily all gold-bearing, but plenty of them are. Please note that not all reefs are mapped in GeoVic - you can come across lots of small exposed reefs in the bush which are not marked out on this map.
You can check out the 'legend' tab at any time to check out what any other geological features are showing on your map.
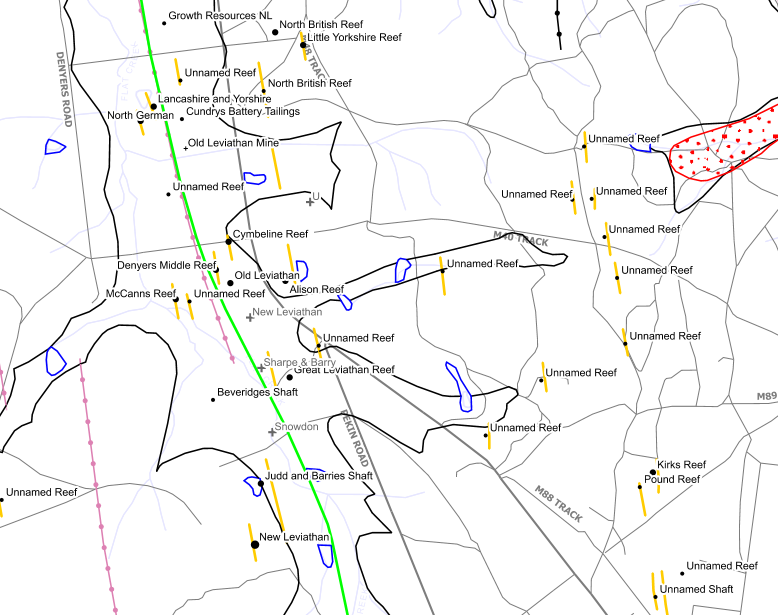
You can then add some more detail by adding another couple of layers - 'Mines and Mineral Occurrences' and 'Historical Mining Activity' - which you will find under the Minerals category.
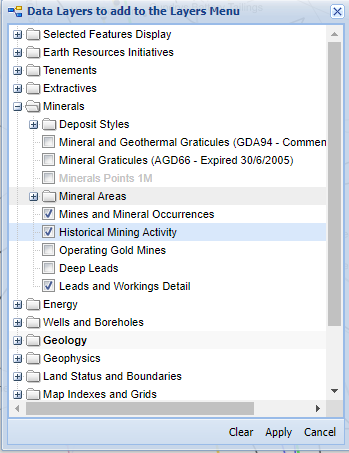
This adds the names of some mining companies, operations, and mineral occurrences to our map.
More detailed information
You can get more information on things using the 'Identify' icon, which is one of the icons at the top of the map area. It is a blue circle with a drop down arrow beside it. Select this tool, and click the drop down arrow. You want to make sure that 'visible layers' is selected, otherwise it will only show you information about whichever layer is currently active.
Once you have selected this tool, click and drag over an item/object on the map that you want more information about.
It will then bring up a box containing a table of available information about the items/objects you've highlighted.
For mining companies, sometimes details are available such as mine depth, type, production amounts, mineral assemblage, host ground type, and more.
Some mines will also state how accurate their location is on the map, for example it might say they are +/-30m meaning the location is accurate to within 30m.
where are you allowed to prospect for gold?
With a Miners Right, prospecting is allowed in most State Forests, many Reserves and private property with the land owner's permission. Prospecting is also permitted on Crown Land (except for Prohibited Crown Land), and permitted areas in certain parks under the National Parks Act.
Please see the following resources for more information regarding land access rules for gold prospectors:
You can add layers to your map in GeoVic showing Crown Land and public reserves.
Click the green plus button to add more layers, and you will find these:
- Land Status and Boundaries > Crown Land
- Land Status and Boundaries > Public Land > Public Land Management - Detail
Now we can see the different types of public land on our map as well! Very handy.
More useful layers in GeoVic
Here are some other layers you might find useful or interesting, have a play around with them to find which ones suit what you're working on:
- Topography > Contours
- Other Maps > Vicmap Topo - 100k - Jan 2017 (1m)
- Wells and Boreholes > Wells and Boreholes - All
- Minerals > Operating Gold Mines
- Minerals > Deep Leads
- Tenements > Minerals > All Mineral Tenements (you can also narrow this down in this section by different types of current and expired tenements)
A few more useful features in GeoVic
There are lots of nifty little features within GeoVic which make your research easier. These are located in the row of icons above the map area. Some handy tools are:
- Google maps (earth icon with magnifying glass). Opens Google Maps in a new browser page and takes you to the current location on GeoVic. Very handy!
- Markup/Redline (pencil icon). This allows you add your own notes, pins, and coordinates to the map.
- Coordinate Display (x y icon, left). This shows the coordinates in various formats of wherever your mouse cursor is.
- Zoom to map coordinate (x y icon, right). Enter a set of coordinates and it will zoom to that location on the map.
- Measurement tools (calculator icon). This has a drop down arrow with several features. This allows you to make detailed measurements on the map.
Historical Gold Map high quality prints
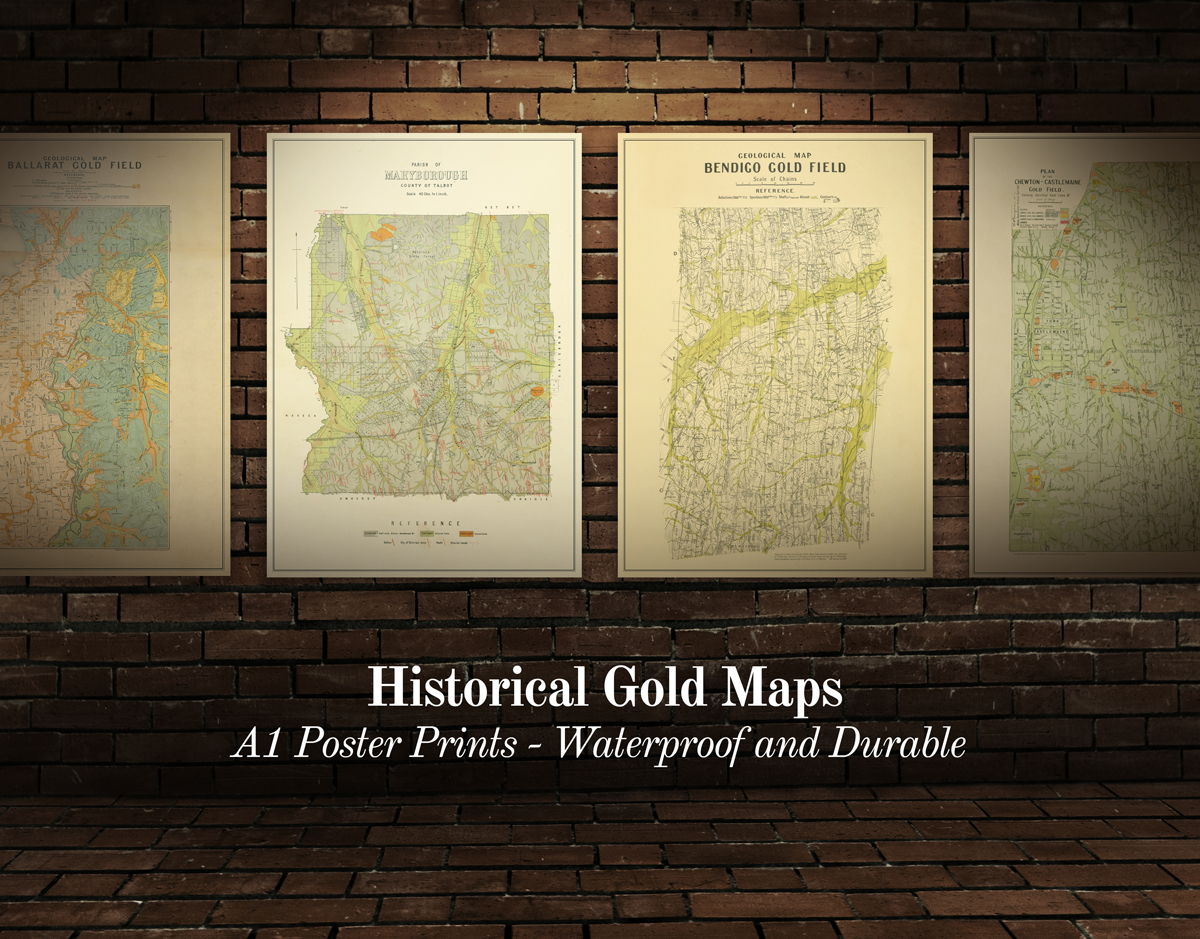
These stunning goldfields maps display fascinating historical features in superb detail!
These maps have been professionally retouched and enhanced, styled as a matching set, then printed on a high quality 200gsm synthetic paper made of highly durable polypropylene material. They have excellent tear resistance, chemical resistance and UV resistance, and are topped off with a sleek satin finish!
Visit our online shop!
That's all for now!
I hope this quick tutorial has helped a few people get started using GeoVic!
GeoVic is such a brilliant application with many useful features for researching gold locations. While there is a lot more you can do with it (outside the scope of this tutorial), hopefully this introduction will help anyone interested in prospecting or mining history who's first opening up GeoVic and unsure what they're looking at.
Cheers!
PROSPECTORS AND MINERS ASSOCIATION VICTORIA
Established in 1980, the Prospectors and Miners Association of Victoria is a voluntary body created to protect the rights and opportunities of those who wish to prospect, fossick or mine in the State of Victoria, Australia.
You can support the PMAV in their fight to uphold these rights by becoming a member. You'll also gain access to exclusive publications, field days, prospecting tips, discounts and competitions.
Check out the PMAV website for more information.